02-01-2018, 10:58 AM
annoyingly some great advise is being lost because the questions and answers are now showing up on facebook.
this is a facebook post i just saw again today
so i'm reposting it here,
Steve O'Hara to Vintage Kart Stuff
A friend picked up an nice Dart A-Bone that had been in storage for decades. Rear wheels were rusted on the axle and would not budge even after treating with heat and penetrating oil. He was ready to chop the axle up and buy a new one in order to get the wheels in a press to free them from the rusted axle. I talked him into bringing it to my shop and told him I would get the wheels off without damaging any parts. For those that are faced with the same problem, the pics show how we solved the problem. Took about 15 minutes and some scrap metal to build the device. The beams across the back are not allowed to touch the rim. A split collar was used to extend the inner hub area inboard beyond the plane of the outer rim so the rear beams apply pressure only to the spacer and inner hub. If anyone wants to borrow the tool just cover the shipping and it's free to the vintage karting community.

Henry Brooks Theres too many "racers" nowadays that have no idea what it is to do more with less. Hats off to you, sir!!
[/url]4
[url=https://www.facebook.com/ufi/reaction/profile/browser/?ft_ent_identifier=1659534214085732_1659537337418753&av=1253532257]
Tim Koscher Nice job of problem solving! Somewhat of a lost art for most
Al Hasenfratz It's the old push n pull! I use the same method on seized bushings and sleeves. Sometimes you have to go back and forth a few times, but once it cracks loose, you're on your way! Penetrating oil helps a lot, especially when you have to pull any distance. Thanks Steve, a picture is worth a thousand words
Dominic Salvato Kroil and a bit of pressure.. Walk away. You'll hear a pop when it's ready to let go..
Lee Cooley could you show a pic of the other side of it?
Steve O'Hara The back side is two 1.25" square tubes spaced 1" apart. On one end they are welded together with a 1" section between them to form a horseshoe shape so it can slide over the axle. In the photo the upper beam is rusty and the lower half is painted white so it looks like part of the bench frame. There is nothing sacred about the size of the tubing, it just had to be strong. The scraps I used are heavy wall tubing. The front side is a scrap of common 3" x 4" angle iron. The studs are 5/8" all thread rod. To keep the center drive stud from slipping off the end of the axle we left the axle nuts on with about 1/4" of the nut hanging off the end of the axle until the wheel moved far enough to reach the nut. Once the wheel moved the first half inch it didn't take much force to pull it off the rest of the way so alignment was not an issue. Pretty simple.
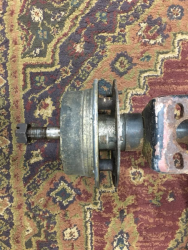
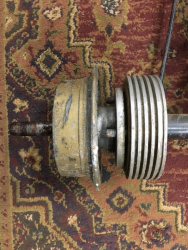
Dan Flanders Any chance it would work to unstick this mess. Started pulling with a modified 3 jaw system, but started to tweak the sprocket stand. Dominic Salvato you got any insight. It’s got the Uber rare dual keyed Go Power rims I don’t want to ruin

Dan Flanders Other side

Steve O'Hara Dan, I would try making a thick flat steel or aluminum plate about 5" square and use the outer wheel half as a template to drill holes in the plate that match the screw hole pattern in the wheel. Then use long screws through the plate and through the screw holes in the inside half of the wheel that will plant the steel plate up against the end of the axle.
Proceed to tighten the screws in a regular pattern until the wheel begins to move. If a lot of torque is needed apply some heat with a plumbers torch to the inner hub area of the wheel and apply some kind of lube like Kroil to help free it up. The heat will help the oil wick into the joint and also provide some minor help through thermal expansion.
Tom Smith Heat it evenly with a rosebud tip and the wheel will probably fall off.
Dominic Salvato Kroil, it creeps. I've taken out broke bolts everything. Don't hurry it or you pay for the learning curve.
this is a facebook post i just saw again today
so i'm reposting it here,
Steve O'Hara to Vintage Kart Stuff
A friend picked up an nice Dart A-Bone that had been in storage for decades. Rear wheels were rusted on the axle and would not budge even after treating with heat and penetrating oil. He was ready to chop the axle up and buy a new one in order to get the wheels in a press to free them from the rusted axle. I talked him into bringing it to my shop and told him I would get the wheels off without damaging any parts. For those that are faced with the same problem, the pics show how we solved the problem. Took about 15 minutes and some scrap metal to build the device. The beams across the back are not allowed to touch the rim. A split collar was used to extend the inner hub area inboard beyond the plane of the outer rim so the rear beams apply pressure only to the spacer and inner hub. If anyone wants to borrow the tool just cover the shipping and it's free to the vintage karting community.
Henry Brooks Theres too many "racers" nowadays that have no idea what it is to do more with less. Hats off to you, sir!!
[/url]4
[url=https://www.facebook.com/ufi/reaction/profile/browser/?ft_ent_identifier=1659534214085732_1659537337418753&av=1253532257]
Tim Koscher Nice job of problem solving! Somewhat of a lost art for most
Al Hasenfratz It's the old push n pull! I use the same method on seized bushings and sleeves. Sometimes you have to go back and forth a few times, but once it cracks loose, you're on your way! Penetrating oil helps a lot, especially when you have to pull any distance. Thanks Steve, a picture is worth a thousand words
Dominic Salvato Kroil and a bit of pressure.. Walk away. You'll hear a pop when it's ready to let go..
Lee Cooley could you show a pic of the other side of it?
Steve O'Hara The back side is two 1.25" square tubes spaced 1" apart. On one end they are welded together with a 1" section between them to form a horseshoe shape so it can slide over the axle. In the photo the upper beam is rusty and the lower half is painted white so it looks like part of the bench frame. There is nothing sacred about the size of the tubing, it just had to be strong. The scraps I used are heavy wall tubing. The front side is a scrap of common 3" x 4" angle iron. The studs are 5/8" all thread rod. To keep the center drive stud from slipping off the end of the axle we left the axle nuts on with about 1/4" of the nut hanging off the end of the axle until the wheel moved far enough to reach the nut. Once the wheel moved the first half inch it didn't take much force to pull it off the rest of the way so alignment was not an issue. Pretty simple.
Dan Flanders Any chance it would work to unstick this mess. Started pulling with a modified 3 jaw system, but started to tweak the sprocket stand. Dominic Salvato you got any insight. It’s got the Uber rare dual keyed Go Power rims I don’t want to ruin
Dan Flanders Other side
Steve O'Hara Dan, I would try making a thick flat steel or aluminum plate about 5" square and use the outer wheel half as a template to drill holes in the plate that match the screw hole pattern in the wheel. Then use long screws through the plate and through the screw holes in the inside half of the wheel that will plant the steel plate up against the end of the axle.
Proceed to tighten the screws in a regular pattern until the wheel begins to move. If a lot of torque is needed apply some heat with a plumbers torch to the inner hub area of the wheel and apply some kind of lube like Kroil to help free it up. The heat will help the oil wick into the joint and also provide some minor help through thermal expansion.
Tom Smith Heat it evenly with a rosebud tip and the wheel will probably fall off.
Dominic Salvato Kroil, it creeps. I've taken out broke bolts everything. Don't hurry it or you pay for the learning curve.
Dave L.


