11-07-2017, 10:10 AM
part two
building the pipe and adapters to eliminate flex pipe.
finished expansion chamber a large washer still needs to be installed at the small end for safety purposes. otherwise in a collision the e-chamber becomes a fine example of a coring tool. conversely a "sweet potato" style cover may be installed over the stinger to lower noise emissions. a 1" hole needs to be added to silencer can for venting
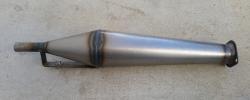
expansion chamber adjustable frame mount detail.
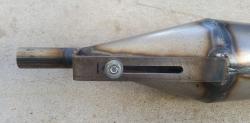
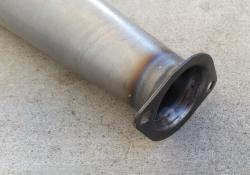
expansion chamber header end detail.jpg
comments from the builder will appear in quote boxes.
finished adjustable header
this adjustable header eliminates the need for various length sections of flex pipe used to fine tune a kart to a specific track.
the u shaped header section is made long on the e-chamber side deliberately so adjustments are possible.
the slip section of this design is sized with the i.d. of the slip pipe being one size bigger than the o.d. of the header.
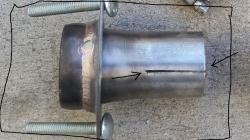
a simple slot with two attached hose clamps completes the slip /tighten function of the header design.
the connection between the header and e-chamber is accomplished by using the outer race of a standard 1" axle bearing - a pair of two hole axle flanges - two grade 5 bolts and a couple of compression springs.
the e-chamber also has an adjustable mount on the far end to allow easy moves when adjusting the e-chamber track side.
adjustable header detail blow up.
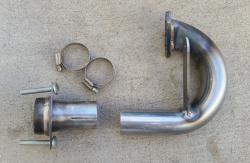
adjustable header detail fully closed
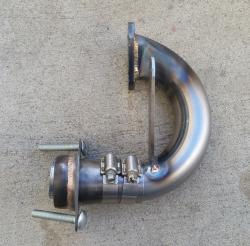
adjustable header detail fully open.

header build details
pix (a) 2 inch ball bearing and forming tool for flange side of header tool

pix (b) bearing outer race being test fitted to expanded pipe

below explains what else you need to start taper and hold ball bearing to expand pipe when pressing
building the slip section of adjustable header

here is a picture of the expansion chamber and header cleanly installed in kart

side view of header and e-chsamber installed note spring in bolts for anti vib function
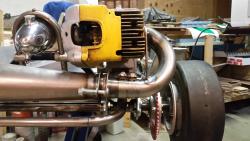
installed header close in detail

building the pipe and adapters to eliminate flex pipe.
finished expansion chamber a large washer still needs to be installed at the small end for safety purposes. otherwise in a collision the e-chamber becomes a fine example of a coring tool. conversely a "sweet potato" style cover may be installed over the stinger to lower noise emissions. a 1" hole needs to be added to silencer can for venting
expansion chamber adjustable frame mount detail.
expansion chamber header end detail.jpg
comments from the builder will appear in quote boxes.
Quote:Hi David,
I made the header today. Now I have to make the slip joint that uses the outer race of an axle bearing and add the strap that goes up to the head. I made a form tool that I can pound into the end of the U bend to help shape the end to fit onto the exhaust flange. It still takes hand work to get it right, but the steel form saves me time. I machined .250 thick some flanges a few years ago. It would have more time effective to have had them laser cut. It's a hassle to do them on my cnc since you have to make a sacrificial tooling plate and pre drill the blanks to bolt to the plate before you can cut them. I probably wasted too much time on this project, but I want it to be as close as I can get it to my original Hornet as I last raced it.
finished adjustable header
this adjustable header eliminates the need for various length sections of flex pipe used to fine tune a kart to a specific track.
the u shaped header section is made long on the e-chamber side deliberately so adjustments are possible.
the slip section of this design is sized with the i.d. of the slip pipe being one size bigger than the o.d. of the header.
a simple slot with two attached hose clamps completes the slip /tighten function of the header design.
the connection between the header and e-chamber is accomplished by using the outer race of a standard 1" axle bearing - a pair of two hole axle flanges - two grade 5 bolts and a couple of compression springs.
the e-chamber also has an adjustable mount on the far end to allow easy moves when adjusting the e-chamber track side.
adjustable header detail blow up.
adjustable header detail fully closed
adjustable header detail fully open.
header build details
pix (a) 2 inch ball bearing and forming tool for flange side of header tool
pix (b) bearing outer race being test fitted to expanded pipe
below explains what else you need to start taper and hold ball bearing to expand pipe when pressing
Quote:Hi David,
There's two more tools I forgot to take a picture of. One is a tapered piece of round bar that I press into the short slip header pipe to start the expansion. The other is a piece of stepped round bar that I use to hold the now tapered slip pipe so I can hold it to press the round ball into it to expand it the last little bit to match the outer bearing race. I could have done it all with one tapered tool, but I was using a tapered round bar I made a long time ago to make KT100 headers and it wasn't long enough to do this header. In the old days I had to do all of this with hammers etc because I didn't have a lathe or mill to make form tools with. Making headers is a hassle and if I had more $$$ or could buy what I need I would. Making this crap is NOT fun, it's just a way to get what I need and want without spending $$$. The second flangette that goes onto the slip joint gets the bearing area shortened to make it fit on the bearing area better. This is a header style that is only needed on Hornet sprints or enduros that have the swing mounts. Allegros, SS sidewinders and other models don't have the rubber mounted pivoting swing mounts. If a person doesn't mind cutting various lengths of spiral wound flex you can easily get by without making this style of header. I liked the incremental adjustment this slip joint made possible. It was a real time saver when at the track.
building the slip section of adjustable header
- insert 2" ball bearing from pix (a) into stepped pipe and put in hydrolic press.
- press ball bearing till outer race will fit cleanly below shows a good fit
- cut two slots opposite each other creating a slotted slip pipe
- weld and bearing to slip pipe bearing outer race to expanded pipe section
here is a picture of the expansion chamber and header cleanly installed in kart
side view of header and e-chsamber installed note spring in bolts for anti vib function
installed header close in detail
Dave L.


